
How to Film Your First UGC Video: Lighting, Audio, and Framing Basics
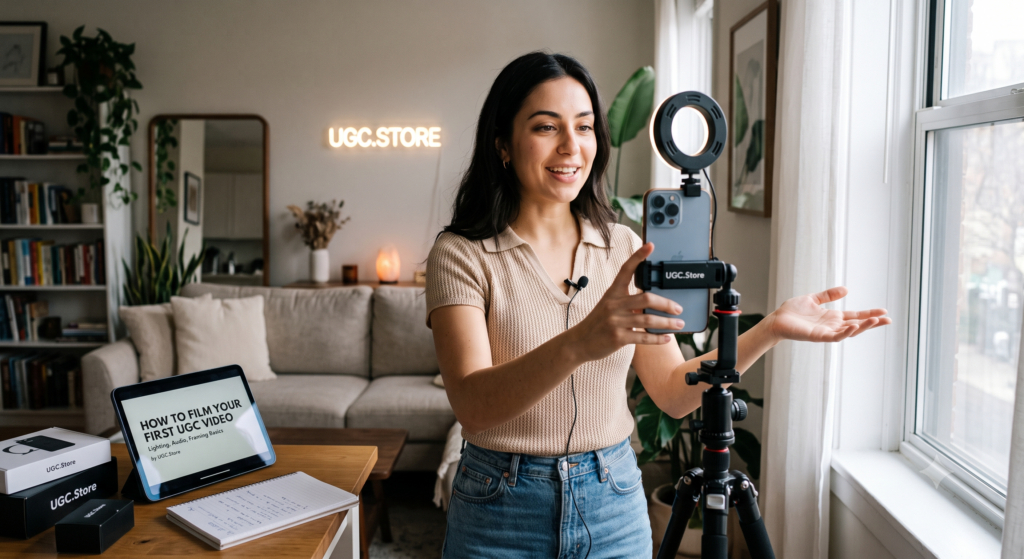
You are standing in your bedroom, phone in hand, staring at the product on your desk. You have read the guides. You have chosen your niche. You have built your UGC.Store profile. And now it is time to do the one thing that actually matters: press record and film your first UGC video.
If your heart is racing right now, that is completely normal. Every professional UGC creator — every single one earning thousands of dollars per month — stood exactly where you are standing right now. The difference between them and the people who gave up is not talent. It is not expensive equipment. It is the willingness to film something imperfect, learn from it, and film again.
This guide will teach you the three technical pillars that separate amateur UGC content from professional UGC content: lighting, audio, and framing. Master these three elements and your videos will look and sound better than 90% of what is currently on the market. Ignore them and even the best script in the world will fall flat.
We will cover everything in plain language. No film school jargon. No unnecessary complexity. Just the exact techniques that make UGC videos convert.
“I filmed my first twenty UGC videos in the exact same spot: sitting on the edge of my bed, phone propped on a stack of books, facing a window. I did not own a ring light. I did not own a microphone. But I understood that soft window light at 11 AM made me look approachable, and that was enough to land my first five clients.”
— Elena V., UGC Creator (Beauty & Lifestyle), $6K/month
The Lighting Equation: Why It Matters More Than Your Camera
Here is a truth that will save you thousands of dollars: a $100 phone in great light produces better UGC content than a $3,000 camera in bad light. Lighting is not just one factor in video quality. It is the factor. It determines whether you look energetic or exhausted, whether your product looks premium or cheap, and whether viewers trust you or scroll past you in the first second.
The goal of UGC lighting is not perfection. It is authenticity with clarity. You want viewers to see your face clearly, see the product clearly, and feel like they are in the room with you. Not like they are watching a movie. Like they are FaceTiming a friend who is excited to show them something new.

The Free Option: Natural Window Light
If you have a window and a few hours of daylight, you already have the best lighting setup available to beginner UGC creators. Natural window light is soft, diffused, and flattering in a way that artificial lights struggle to replicate. The key is knowing how to use it.
Film within three to six feet of your largest window. Not across the room. Not near the window. Within three to six feet. The closer you are to the window, the softer and more directional the light becomes. This creates gentle shadows that add dimension to your face rather than flattening it into a blurry blob.
The best time to film is between 10 AM and 2 PM, when the sun is high enough to flood through the window but not so low that it casts long, dramatic shadows. If the light is too harsh — creating sharp shadows under your eyes and nose — diffuse it with a thin white curtain or a bedsheet hung in front of the window. This costs nothing and transforms harsh sunlight into the soft, glowing light that beauty brands pay photographers hundreds of dollars per hour to create.
Never film with the window behind you. This is the most common lighting mistake beginners make, and it destroys video quality instantly. When the light source is behind you, your face falls into shadow while the background becomes blindingly bright. This is called backlighting, and it makes you look like a silhouette. Instead, position yourself so the window is in front of you or slightly to the side. Your face should be the brightest thing in the frame.

The Budget Upgrade: Ring Light or LED Panel
When natural light is unavailable — early mornings, late evenings, cloudy days, or rooms with small windows — a $25–$35 ring light or LED panel becomes your best friend. Ring lights are particularly popular among UGC creators because they create an even, shadowless illumination that makes skin look smooth and eyes sparkle with small circular catchlights.
Place your ring light directly behind your phone, at eye level or slightly above. If it is too low, you get horror-movie lighting from below. If it is too high, you get dark shadows under your eyes and chin. Eye level or slightly above is the sweet spot.
LED panels offer more directional control than ring lights. You can angle them to create subtle shadows that add depth and dimension to your face. For UGC creators filming tech unboxings or product close-ups, an LED panel often works better than a ring light because it can be positioned to highlight the product’s texture and details without washing out the creator’s face.
The Pro Move: Window Light Plus Reflector
If you want to level up without spending money, add a reflector to your window light setup. A reflector is simply a white surface that bounces light back onto the shadow side of your face. You can use a white poster board, a bedsheet, a piece of foam core from a craft store, or even a white wall positioned at a 45-degree angle from your face.
Place the reflector on the opposite side of your face from the window. If the window is to your left, the reflector goes to your right. This fills in the shadows on the right side of your face, creating balanced, professional-looking illumination that flatters every skin tone. The difference between window light alone and window light plus a reflector is the difference between good UGC content and great UGC content.
The Audio Imperative: Why Viewers Forgive Bad Video But Not Bad Sound
Here is a counterintuitive fact about UGC content: viewers will watch a slightly grainy, poorly lit video if the audio is crisp and clear. But they will scroll past a perfectly lit, beautifully framed video in under three seconds if the audio is echoey, muffled, or drowned out by background noise.
Human brains are wired to prioritize sound over image when processing communication. We can fill in visual gaps with our imagination. But garbled audio breaks comprehension entirely. If the viewer cannot understand what you are saying, they cannot trust what you are saying. And trust is the currency of UGC marketing.

Distance Is Everything
The single biggest audio mistake beginner UGC creators make is filming too far from the phone. Your phone’s built-in microphone is designed for phone calls, not professional voice recording. At three feet away, it picks up more room echo than actual voice. At one foot away, it captures significantly clearer audio with less ambient noise.
For testimonial-style UGC videos where you are speaking directly to camera, position your phone 12 to 18 inches from your face. That is roughly the length of a standard laptop or the distance of a comfortable FaceTime call. At this distance, your phone microphone captures warm, intimate audio that feels personal and trustworthy.
For unboxing or tutorial videos where you need to show your hands or a product, film the visual from a wider angle, then record a separate voiceover track at close distance. Most editing apps, including CapCut, allow you to replace the original audio with a voiceover recorded directly into the app. This takes an extra two minutes and transforms your audio quality from amateur to professional.
Environment Matters More Than Equipment
Before you spend money on a microphone, optimize your recording environment. A $200 microphone in a bathroom with tile walls will sound worse than a phone microphone in a carpeted bedroom with curtains.
Hard surfaces — tile, hardwood, glass, bare walls — reflect sound and create echo. Soft surfaces — carpet, curtains, upholstered furniture, clothing racks — absorb sound and create clean, dry audio. Film in the softest room in your home. If your bedroom has carpet and curtains, it is probably your best studio. If your kitchen has tile floors and granite counters, it is probably your worst.
If you must film in a hard-surface room, add temporary softening. Hang a blanket behind the camera. Put a towel on the table. Wear soft clothing that does not rustle. These small adjustments cost nothing and improve audio quality more than buying a microphone and ignoring your environment.

The $20 Upgrade: Lapel Microphone
Once your environment is optimized, a lapel microphone (also called a lavalier mic or clip-on mic) is the best audio investment you can make as a beginner UGC creator. For $15–$25, you get a tiny microphone that clips to your shirt and captures broadcast-quality audio directly from your mouth.
The setup is simple. Plug the lapel mic into your phone’s headphone jack or charging port, depending on the model. Run the cable down the inside of your shirt so it is invisible on camera. Clip the mic to your collar or placket, about six inches below your chin. Press record. That is it.
The difference between phone audio and lapel mic audio is immediately noticeable. Phone audio picks up room noise, computer fans, traffic outside, and the rustle of your hands. Lapel mic audio isolates your voice and makes it sound full, present, and professional. Brands notice this difference even when they cannot articulate why. A UGC creator with clean audio simply feels more credible.
If your phone does not have a headphone jack, buy a USB-C or Lightning-compatible lapel mic. They cost slightly more — around $25–$35 — but the audio quality is identical. Avoid wireless lapel mic systems as a beginner. They are more expensive, require charging, and introduce connection issues that will frustrate you during filming.
“I bought a $19 lapel mic after my fourth client mentioned that my audio was ‘a little echoey.’ I started using it on every video, and my booking rate increased by 40% within two months. I am convinced that half of those new clients hired me because my voice sounded like I was sitting right next to them.”
— Derek H., UGC Creator (Tech & Fitness), $5K/month
The Framing Formula: How Camera Position Controls Trust
Framing is the art of positioning yourself and your product within the camera’s view. It is not about following rigid rules from photography textbooks. It is about controlling what the viewer sees, when they see it, and how it makes them feel. In UGC content, framing directly impacts trust, engagement, and conversion.

Eye Level Is Trust Level
The most important framing rule in UGC is also the simplest: film at eye level. When the camera looks up at you, you appear dominant and slightly intimidating. When the camera looks down at you, you appear small and submissive. When the camera is at eye level, you appear equal, approachable, and trustworthy.
Eye level means the center of your phone’s lens should be aligned with your eyes. Not your forehead. Not your chin. Your eyes. If you are filming seated, stack books or boxes under your phone tripod until the lens hits that height. If you are filming standing, extend your tripod to its full height and angle the phone down slightly. This adjustment takes 30 seconds and transforms the psychological impact of your video.
The Rule of Thirds for Natural Composition
The rule of thirds is a classic composition technique that applies perfectly to UGC content. Imagine your screen divided into nine equal squares by two horizontal lines and two vertical lines. The four intersection points of these lines are where human eyes naturally gravitate.
For testimonial and talking-head UGC videos, position your face slightly off-center, aligned with the left or right vertical third line. This creates a more dynamic, visually interesting frame than centering your face perfectly in the middle. It also leaves negative space on one side of the screen, which you can use for text overlays, product inserts, or captions.
For unboxing and tutorial videos, position the product at one of the lower intersection points and your hands at the opposite upper point. This creates diagonal visual flow that guides the viewer’s eye naturally through the frame.

Headroom and Lead Room
Headroom is the space between the top of your head and the top of the frame. Too much headroom makes you look small and insignificant. Too little makes you look cramped and claustrophobic. The ideal headroom for UGC content is a small gap — roughly the height of your forehead — between your hair and the top edge of the screen.
Lead room is the space in front of your face if you are turned slightly to the side. If you are looking toward the right side of the frame, leave more space on the right side than the left. This gives your gaze room to “breathe” and prevents the frame from feeling unbalanced.
Distance: Close Enough to Connect, Far Enough to Contextualize
The distance between you and your camera determines the intimacy of the video. For testimonials and direct-to-camera UGC, a medium close-up works best. Your face and upper chest should fill roughly 60% of the vertical frame. This distance feels personal without being invasive. It mimics the distance of a comfortable conversation between friends.
For unboxings and tutorials, a medium shot works better. Your torso and the product should both be visible, with the product occupying the lower third of the frame. This gives viewers enough context to understand the scale and setting while keeping your reactions and expressions visible.
Avoid extreme close-ups as a beginner. Filling the entire frame with your face creates intensity that can feel aggressive rather than authentic. UGC thrives on casual intimacy, not dramatic intensity.
The Complete Filming Checklist for Your First UGC Video
Before you press record, run through this checklist. It takes 60 seconds and prevents 90% of the technical mistakes that ruin beginner UGC videos.

Lighting:
- [ ] I am within 6 feet of a large window, or my ring light is at eye level
- [ ] The light source is in front of me, not behind me
- [ ] There are no harsh shadows on my face
- [ ] The product is clearly visible and well-lit
Audio:
- [ ] I am recording in the softest room available (carpet, curtains, upholstered furniture)
- [ ] My phone or microphone is 12–18 inches from my mouth
- [ ] There is no background noise (fans, AC, TV, traffic)
- [ ] I have done a 10-second test recording and listened with headphones
Framing:
- [ ] My phone is at eye level
- [ ] My face is positioned using the rule of thirds
- [ ] Headroom is appropriate (small gap above my head)
- [ ] The product is visible and positioned for natural visual flow
- [ ] The background is clean and uncluttered
Technical:
- [ ] My phone is in airplane mode (no notifications interrupting filming)
- [ ] I have at least 5GB of storage space
- [ ] My battery is above 50%
- [ ] I am filming in 1080p or 4K at 30fps
- [ ] The phone lens is clean (wiped with a soft cloth)
The 10-Minute Practice Drill
Theory is useless without practice. Here is a 10-minute drill that will transform your filming confidence:
Minute 1–2: Set up your phone at eye level, 18 inches from your face, facing a window or ring light.
Minute 3–4: Record a 30-second testimonial about a product you love. Do not script every word. Just talk.
Minute 5–6: Watch the recording. Identify one lighting issue, one audio issue, and one framing issue.
Minute 7–8: Adjust your setup. Move closer to the window. Reposition the phone. Add a reflector.
Minute 9–10: Record the same 30-second testimonial again. Compare the two versions. Notice the improvement.
Do this drill three times with three different products. By the third round, you will have internalized the fundamentals of lighting, audio, and framing. You will no longer think about them consciously. They will become automatic habits — the same way experienced UGC creators set up their shots without thinking.
Uploading Your First Video to UGC.Store
Once you have filmed a video you are proud of, upload it to your UGC.Store portfolio. The platform is designed for UGC creators at every level, and your first video does not need to be perfect to be valuable. It just needs to exist.
Create your creator profile on UGC.Store and add your first portfolio piece today. Every video you upload increases your discoverability to brands searching for creators in your niche.

As you film more videos, replace your weakest portfolio pieces with stronger ones. Your UGC.Store profile should always reflect your current best work, not your earliest experiments. The creators who get hired consistently are the ones who treat their portfolios as living documents — constantly updated, constantly improving.
Learn more about how UGC.Store connects creators with brands worldwide on our About Us page.
From First Video to Consistent Creator
Your first UGC video will not be your best video. It might not even be good. But it will be the most important video you ever film because it proves that you can start. Every professional UGC creator you admire has a first video buried somewhere on their hard drive — awkwardly lit, poorly framed, and filled with verbal stumbles. They did not delete it because they were ashamed. They kept filming until their hundredth video made the first one irrelevant.
Lighting, audio, and framing are skills, not talents. They improve with repetition. Film one video this week. Film another next week. By your tenth video, you will not recognize the creator from your first. By your fiftieth, brands will be reaching out to you instead of the other way around.
The technical foundation you build today — the window light habit, the close-mic discipline, the eye-level framing — will serve you for your entire UGC career. Master these three pillars and everything else becomes creativity. Everything else becomes fun.
Join UGC.Store and turn your first filmed video into your first paid UGC gig.
